Wednesday, February 25, 2009

Dirty Mouth?

eah, I finally did the pattern for the penis chapstick cozy. I received a surprising amount of requests for it. I'm going to copy and paste it into here. Also...I did manage to make a PDF somehow. I think. But really, I'm not sure how that works exactly. So...it's not online. If you want it, just email me.

Phallic Chapstick Cozy
by Shadkitty

Mr Peen 003


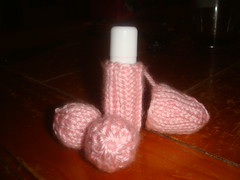
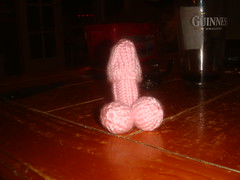
Need a little protection? Grab your penis and put it on your mouth, er, your chapstick that is. This cozy has no functional use whatsoever, but it's HILARIOUS and you'll enjoy it. And, unlike real life, one size fits all!!

MATERIALS
Caron Simply Soft [100% acrylic; 315yd/288m per 170g skein]; color: Pink; all you really need are some scraps

1 set(s) US #4/3.5mm double-point needles

Tapestry needle
Fluff
Key ring (optional)

GAUGE
Useless. Just make it work for you.

PATTERN NOTES
You can attach a keyring if you want to hang this from your keys. Or whatever. Just crochet a chain long enough to meet your standards and attach it to the cozy and the keyring. Use your own smarts for that.

PATTERN

SHAFT
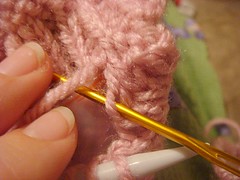
CO 12, leaving a longish tail. Join in round, making sure stitches aren't twisted, yada yada.
Do some k2, p2 ribbing for awhile. Periodically slip the work over chapstick tube. When work reaches from the bottom of the cap to the bottom of the tube:
K 2 rounds plain
Next rnd: *k1, k2tog*

Cut yarn and thread through stitches. Pull shut tight – weave end in on side facing you!! Then turn inside out.

Mr Peen 002HEAD
CO 18. Join in round, blah blah blah. You know the drill.
Round 1: k9 sts together with tail from CO, k9 remaining sts together with tail from body CO. Make sure you leave a little bit of yarn between the body and head. This is the little piece of yarn that connects the two. If you make them too close together you won't be able to get the head off and on easily!
Round 2: knit around
Round 3: k9, inc, k9, inc
Round 4 & 5: knit around
Round 6: *k3, k2tog* to end
Round 7: knit

Rep rounds 6 & 7 until 8sts remain.
Next Round: k2tog around

Cut yarn and pull through remaining sts.

BALLS
(make 2)
CO 8.
Round 1: *k1, kfb* around
Round 2: knit

Rep these 2 rounds once more (16sts). Work St st for 3 rounds.
Next Round: *k1, k2tog* around
Next Round: knit
Next Round: *k1, k2tog* around
Stuff with fluff!

Cut yarn and pull through remaining sts. Attach to body using your good judgement and general knowledge of a man's tool. You are now a penii warrior! Battle the forces of chapped lips!


FINISHING
Ha. I kinda gave most of the finishing details in the pattern instructions. You don't need to really weave in the ends that you knitted together. Just trim them. Weave in any remaining ends. Then pop in your tube of chapstick.

ABOUT THE DESIGNER
Ms. Kitty is completely bonkers. She lives in a constant state of chaos with her man servant and 3 little critters...amongst piles of yarn and laundry. A menial gas station employee by day, and a fiendish knitting powerhouse by night, there is no knitting challenge too great!

I'm getting carried away, go show off your knitted penis.

Garden of Eden

I've been promising this pattern for awhile. Only two of the sizes have been tested (sorry), so let me know how the large size works for those of you who make it. Also, if you make, or model these pasties and don't mind me posting a picture, please email me!

Garden of Eden
by Shadkitty
pasties leaves


Silky leaf shaped pasties in three sizes.

SIZE
S [M, L] (shown in size S)

FINISHED MEASUREMENTS
Width: 2 [2.5, 3] inches

MATERIALS
Cascade Pima Silk [Cotton, Silk ; 109yd/100m per 50g skein]; color: 5144; 1 [1, 1] skein

1 set(s) US size 4/3.5mm straight needles

notions required
Tapestry needle
Stitch markers
Lining fabric in matching color (optional)

GAUGE
24 sts/32 rows = 4" in stockinette stitch

PATTERN NOTES
Use long tail cast on.
PM – place marker (slip all markers as you come to them)
SM – slip marker
SL – slip purlwise


PATTERN
Make 2

CO 3[5, 5] sts. Place stitch markers on either side of middle stitch.
Row 1 and all odd numbered rows (ws): Purl
Row 2 (rs): K to first marker, YO, SM, K1, SM, YO, K to end.
Rep for a total of 3 times (3 rows with eyelets). (9, 11, 11 sts)

SMALL AND MEDIUM
Row 8: K to first marker, M1, SM, K1, SM, M1, K to end (11, 13 sts)

LARGE ONLY
Row 8: K1, M1, K3, M1, K1, M1, K3, M1, K1 (15 sts)

BOTH SIZES
Repeat Row 8 2[3, 4] times more for a total of 15[19, 23] sts

From this point, on all right side rows slip stitch between markers. Purl as usual on wrong side rows.

Next row: K to marker, SM, SL1, SM, K to end
Next row: *SSK, K to marker, SM, SL1, SM, K to the last two stitches, K2tog *
Rep from * to * until 3 sts remain. Remove all markers.
Slip 2 together as if to knit, K1, pass both slipped stitches over knitted stitch. Pull yarn through.


FINISHING
Weave in all ends and block to size. Sew on lining if desired, or let your nips play peek-a-boo! Embellish if desired.

Book Strap

book strap 009Now for the little blurb about the book strap. And the "pattern", if you can call it that. I don't. It's more like...guidelines really. ;)

Ever shoved a book into your purse or backpack, only to discover later that the paper bookmark slipped out? Dunno about you, but my children like to steal my bookmarks, it’s like a sport. This super awesome bookmark STAYS where you put it! And as an added bonus only takes about 10 minutes tops.

Here it is: Leave a 12” tail, crochet a chain twice the length of the spine, and then some. Make a small loop by sl st through the chain somewhere. No real instructions…no counting. Just guess people! Sew on a button ABOVE the loop.

To use: Pull long tail through loop, then bring up through book and around the outside (round the outside….). Wrap tail around button. When you want to read, simply slide off. Works best with paperbacks.

My Flickr and Ravelry both offer more pictures of the book strap that should help clear up the instructions for use. I hope. Just click the picture of it to go to Flickr, or you can sign into Ravelry. It's in my FOs, but you'll have to scroll down a bit to find it.

Buggerloo

Kyran's hat 007This simple cabbie (or newsboy) style hat was created on a whim for my middle son, who I decided needed a hat just like this. However, I couldn't find a pattern that I liked. Then, my daughter wanted one. Now I want one too. They are too cute, and too quick. Short-rows help create a nice round, clean shape to the brim, while the hat is a simple slouchy style hat. Modeled after the latest trends and my favorite hats.

Buggerloo just happens to be one of a ton of variant nicknames I have for my son. This hat fits him perfectly...now only if I could get him to wear it!

SIZE
Small (toddler), Large (child, small adult)

FINISHED MEASUREMENTS
18" (20")

MATERIALS
(Small hat) Lion Brand Vanna's Choice (100% acrylic; 170yds/155m per 100g skein]; color 174: Olive; 1 skein
(Large hat) Ella Rae Amity (75% acrylic, 25% wool; 200yds/183m per 100g skein]; color 45; 1 skein

16" length-inch US 7/4.5mm circular needle
16" length-inch US 9/5.5mm circular needle
1 set US 9/5.5mm double-point needles

crafting plastic
tapestry needle
stitch markers/waste yarn

GAUGE
18 sts/24 rows = 4" in stockinette stitch (on larger needles)

PATTERN NOTES
w&t: wrap and turn, bring yarn to front of work between needles, slip next st to right-hand needle, bring yarn around this st to back of work, slip st back to left-hand needle, turn work to begin working back in the other direction.

For the brim, I purchased uncut craft painting stencil sheets. These can be found at Wal-Mart and chain craft stores.
If you would like a looser hat, knit longer before beginning decreases.

PATTERN
Kyran's hat 009Hat
Using smaller needles, CO 72 (90) sts. Join in round, being careful not to twist, place marker to indicate beginning of round. Work 1x1 rib for 1 inch.

Switch to larger needles, *k2 (3), M1*; rep from * to * til end of round. [108, 120 sts]
Work in St st until piece measures 4 (5) inches from cast-on edge.

Next Rnd: *k18 (20), place marker*, rep from * to * 5 more times
Dec Rnd 1: *k2tog, knit to 2 sts before marker, ssk, slip marker*, rep from * to * 5 more times
Dec Rnd 2: knit around

Repeat dec rnds 1 and 2 until 24 sts remain (switching to DPNs when necessary), then work rnd 1 once more [12 sts]. K2tog around [6 sts], break yarn and thread through sts. Pull tight.

Brim
Locate join on cast-on edge, using larger needles pick up and knit 12 (15) sts on each side of the join. [24, 30 sts total]

Small Only
Row 1 (WS): Purl across
Row 2 (RS): K 22, w&t
Row 3: P 20, w&t
Row 4: K 19, w&t
Row 5: P 18, w&t
Row 6: K 17, w&t
Row 7: P 16, w&t
Row 8: K 15, w&t
Row 9: P 14, w&t
Row 12: K 13, w&t
Row 11: P 12, w&t

Large OnlySnow Day 14
Row 1 (WS): Purl across
Row 2 (RS): K 28, w&t
Row 3: P 26, w&t
Row 4: K 25, w&t
Row 5: P 24, w&t
Row 6: K 23, w&t
Row 7: P 22, w&t
Row 8: K 21, w&t
Row 9: P 20, w&t
Row 10: K19, w&t
Row 11: P18, w&t
Row 12: K17, w&t
Row 13: P16, w&t
Row 14: K15, w&t
Row 15: P14, w&t
Row 16: K13, w&t
Row 17: P12, w&t

Both Sizes
Next Row: Knit across, picking up next 4 (7) wraps and knitting them together with wrapped stitches as you go. For last wrapped stitch, pick up wrapped stitch, then slip wrap, wrapped stitch, and last stitch - knit through back loops.
Next Row: Purl across, purling next 4 (7) wraps with their wrapped stitches when you come to them. For last wrapped stitch, pick up wrapped stitch and p3tog (wrap, Pink Cabbie Hat 005wrapped stitch, and last stitch)

FINISHING
Cut plastic to fit into brim (keep in mind that the stitches have a bit of stretch). Weave ends (from cast on and brim join) into brim. Place plastic and graft live stitches to cast-on edge, making sure to keep plastic in place. Weave in remaining ends.

Oh Snap!! Now you have a super rockin hat, go pimp it and see how many people ask you where you bought it!

Buggerloo 03

Norwegian Baby Hat

This is a hat that was reverse engineered from a picture on Gros Blog. To knit the original fingering weight version, she now has an English version.

Norwegian Hat 3


Materials:
Heavy worsted weight yarn (approx 50-60yds)
Size 9 DPNs (or size needed to obtain gauge)
Stitch markers
Tapestry needle

Gauge: 4sts = 1"

Sizes: 0-3mos, 2-6mos, 6-9mos, 9-12mos
Finished Measurements: 13", 14", 15" 17"

Pattern Notes:
PM - place marker
DD - slip 2 sts together as if to knit, K1, pass slipped sts over
KLL & KRL - to view videos of these increases look here, you'll have to scroll down

I count the increase as one stitch, seperate from the stitches knitted before and after it. Remember that when counting stitches or you might end up off a stitch.

DIRECTIONS:

Norwegian Hat Side 2CO 53 (57, 63, 69) sts. Join in the round, being careful not to twist. Work in garter stitch for 3/4", ending with a knit round. K 18 (19, 21, 23), PM, K 17 (19, 21, 23), PM, K 17 (19, 21, 23). Markers are to help you remember where to increase, placing a marker for the decreases is (unfortunately) more of a hassle than a help.

Continue as follows:

RND 1: KRL, K 8 (8, 9, 10), DD, K to marker, KLL, KRL, K 7 (8, 9, 10), DD, K to marker, KLL, KRL, K 7 (8, 9, 10), DD, K 8 (8, 9, 10), KLL

RND 2: K around

Rep these two rounds until hat measures 3 (3, 4, 5) inches, remove markers and omit increases in RND 1 after this point. Continue until 5 (6, 6, 6) sts left.

Norwegian StyleFinishing
Break yarn and thread tail through remaining stitches using tapestry needle. Weave in ends and promptly chase down some poor infant to model your work!

Converse Booties Baby!

It has come to my attention that this pattern is extremely confusing. Seeing as how it was one of my first forays into pattern writing, I am editing it for clarification. And will also update Ravelry for it.

This is just my version of an already available pattern. Use it if you will. This pattern is knit flat (despite a photograph of them being knit in the round below) and uses intarsia and very simple short rows (no wrapping). Please email/ message me with any questions.

Booties in action


Materials

Main Color- Black (MC)
Contrast Color-White (CC)
I used Caron Simply Soft (worsted weight)

One pair sizes 4 and 5 straight needles (or size to obtain gauge for smaller size), and 1 pair size 5 and 6 straight needles (or size to obtain gauge for larger size)

Other Supplies: tapestry needle; white felt; blue paint or marker; crochet hook; row counter (optional)

Gauge: smaller size: 24sts over 4" on size 5
larger size: 21sts over 4" on size 6

To Begin
With smaller needles and CC cast on 26 stitches and knit 1 row.
Row 1: k1, yo, k11, [yo, k1] twice, yo, k11, yo, k1.
Row 2, 4, 6, 8, 10: knit (when you reach the yo knit in the back of the stitch).
Row 3: k2, yo, k11, yo, k2, yo, k3, yo, k11, yo, k2.
Row 5: k3, yo, k11, [yo, k4] twice, yo, k11, yo, k3.
Row 7: k4, yo, k11, yo, k5, yo, k6, yo, k11, yo, k4
Row 9: k5, yo, k11, [yo, k7] twice, yo, k11, yo, k5.

more chucksNext
Change to larger needles
Row 11: knit across using CC
Row 12: purl with CC
Row 13: knit across using MC
Row 14: purl CC
Row 15: knit CC
Row 16: purl CC
Row 17: knit MC
Row 18: (begin color work) p19 MC, p13 CC, p19 MC

Shape Toe
Using MC and CC.

Row 1: k19 MC, k10 CC, SKP CC, turn.
Row 2: sl 1, p7CC, p2tog, turn.
Row 3: sl 1, k7, SKP, turn.
Row 4: sl 1, p7, p2tog, turn.
Row 5: sl 1, k7 CC, sl 1 CC, k1 MC, psso, turn
Row 6: sl 1, p7 CC, p2tog MC, turn.
Row 7: sl 1, k7 CC, SKP MC, turn.
Row 8: sl 1, p1 MC, p5 CC, p1 MC, p2tog, turn.
Row 9: sl 1, k2 MC, k3 CC, k2 MC, SKP, turn.

Using MC only now
Row 10: sl 1, p7, p2tog, turn.
Row 11: sl 1, k7, SKP, turn.
Row 12: sl 1, p7, p2tog, turn.
Row 13: sl 1, k7, SKP, turn.
Row 14: sl 1, p7, p2tog, turn.
Row 15: sl 1, k7, SKP, knit to the end of the row.
Row 16: p 21, p 2 tog, purl to the end of the row (35 stitches).


Side 1:

Row 1: k11, yo, k2tog, k1 (place remaining stitches on stitch holder or spare dpn)
Row 2: Purl
Row 3: k11, k2tog, k1
Row 4: Purl
Row 5: k10, yo, k2tog, k1
Row 6: Purl
Row 7: k10, k2tog, k1
Row 8: Purl
Row 9: k9, yo, k2tog, k1
Row 10: Purl
Row 11: k9, k2tog, k1
Row 12: knit
Row 13: knit
Bind Off

Tongue:
Place 7 Stitches from the Stitch marker onto the needle. Rejoin yarn.
Row 1: p across
Rows 2, 4, 6 & 8: k across
Rows 3, 5, 7 & 9: k1, p5, k1
Row 10: ssk, k3, k2tog
Row 11: p across
Bind Off

Side 2:

Row 1: k1, ssk, yo, k11
Row 2: Purl
Row 3: k1, ssk, k11
Row 4: Purl
Row 5: k1, ssk, yo, k10
Row 6: Purl
Row 7: k1, ssk, k10
Row 8: Purl
Row 9: k1, ssk, yo, k9
Row 10: Purl
Row 11: k1, ssk, k9
Row 12: Knit
Row 13: Knit
Bind Off


Laces:
Using a color that you wish.

CO 3 stitches.
I-Cord for 15 inches… or amount desired.
-OR-
crochet chain for 15 inches

twin booties fin
Finishing:
Weave in ends.
Sew bottom seam of booties and back seam.
Make circle with star and sew to left side of bootie. For this I used white adhesive felt and a blue sharpie marker.
Lace up the Converse and rock 'em!